

The study titled, ‘Simple Maxillary Sinus Tenting and Implant Placement’ was originally published by Dentistry Today.
Sometimes, a clinician has to treat a patient whose bone quantity or quality may not be conducive for dental implant placement. During such times, the clinician can conduct a secondary surgical technique that can augment the bone to stabilize or position the implant. Dental implants have been widely accepted as a proper mode of treatment for patients. Modern dental implants are reliant when it comes to integrating them into the bone.
The requirements include a healthy patient with sufficient availability of hard tissue. Furthermore, the patient must not show any signs of poor healing properties. Initial stability is crucial. Bone grafting techniques must also be implemented. They must involve the addition of a bone substitute to a deficient area. This is done to create improved density and additional bone volume. A common material known as allograft can be used for this procedure.
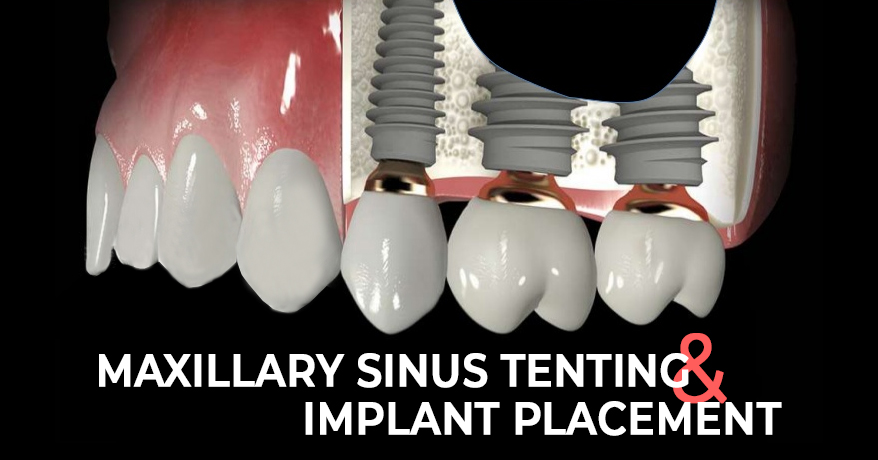
Sinus tenting procedures can seem intimidating to the practitioner. This is because when teeth are lost, we notice psychological shrinkage vertically and palatally. In the first 3 years after extraction, the subsequent socket can lose 40-60% bone structure. What makes matters more complicated is the maxillary posterior area. The reason being, when the tooth in the sinus area is extracted, the sinus floor gives off, enlarging the sinus cavity. Moreover, there is not enough hard tissue in vertical height to place a dental implant.
In a few situations, sinus testing can be quite a simple procedure. The clinician needs to lift the maxillary sinus membrane upward to create some space for the additional bone. This provides the availability of hard tissue for the dental implant. Separated by septae, the maxillary sinus can be segmented into compartments. Keep in mind to evaluate thoroughly before any surgical intervention. Over time, the newly formed bone around the grafted dental implant will resemble the native bone.
Case Report:
1) Diagnosis and Treatment Planning
A female patient of 69 years wanted a permanent tooth replacement in the maxillary first molar area. She wanted to improve her broad smile. Her overall health had no contradictions to prevent her from a dental implant restoration. However, her CBCT report clearly showed an improper height of hard tissue. This meant the site was not conducive to receive an implant that would have stability and ideal positioning. The axial view showcased the plane that is parallel to the ground. The sagittal view displayed the plane perpendicular to the ground. Due to this 3D evaluation, the clinician could determine bone growth in the sinus cavity followed by an implant placement to support an implant-retained crown.
2) Clinical Protocol
Various procedures can be used to fill the sinus cavity. These procedures depend on how invasive the surgery will be and the availability of residual bone height. Let’s look at an invasive approach, also known as the Caldwell Luc technique. The clinician first begins by creating a lateral window in the edentulous space. The sinus is then filled with grafting material.
In a less invasive procedure, the maxillary sinuses membrane, also known as Schneiderian membrane, is stretched during elevation. This is carried out using osteotomes. However, instead of using valuable hard tissue, the medullary bone is compressed, the sinus floor is elevated, and an osteotomy is created to accept a dental implant. The Schneiderian membrane has columnar epithelial cells and is bilaminar in shape. A tearing in this membrane could lead to sinus congestion and upset the osseointegration of the implant. Large perforations should be avoided. Small holes, on the other hand, can be repaired by the surgeon using a resorbable membrane.
3) Treatment
Tenting and implant placement began with correct angulation using a 2.4mm pilot bur. The osteotomy was initiated with this bur. A maxillary molar tooth replacement that was 8mm wide was planned. The placement was 4mm from the adjacent tooth. Since less bone height was obtainable, the pilot bur was positioned about 4mm into the available hard tissue. The soft tissue was approximately 2mm thick. A flapless technique was considered, and the pilot bur position was easily visualized at 6mm at the level of soft tissue. Penetration into the sinus cavity was avoided, and verification was carried out using a DEXIS system.
A 3mm Hahn bur was used to widen the osteotomy. The bur was positioned at 8mm and was measured using a periapical radiograph. No penetration in the sinus cavity was noticed. A surgical punch was used to extract the soft tissue from the osteotomy area. The precise incision eradicated any possibilities of soft tissue infiltration in the osteotomy area. It also reduced the possibility of any discomfort occurring post-surgery. The reason being the clinician was removing the attached gingiva.
A series of osteotomes were preferred to widen the osteotomy area, elevate the sinus floor and condense the medullary bone. All this was carried out without affecting the Schneiderian membrane. By using a periapical radiograph, verification of proper position was carried out. To establish depth, the osteotomy was widened. The area was now prepared for grafting. An allograft material and a resorbable membrane were used.
The membrane was placed into the surgical site, and the osteotomes were used to elevate the sinus floor. Using a torqued wrench, the Hahn Implant System was threaded into place. This implant system has buttress threads that can easily widen at the apex. The design is perfect for creating implant stability in the osteotomy area. A final torque of 45 Ncm was achieved, indicating that implant stability in the medullary bone was attained. Furthermore, the sinus floor was elevated without perforations.
The implant was uncovered after 4 months of integration. An impression coping was inserted, and a final impression was created using vinyl polysiloxane. A zirconia crown was placed and torqued to 35 Ncm. Composite resin was preferred to pack the access hole. Hence, by following sinus tenting, tooth replacement using a dental implant was carried out.
Conclusion:
The technique covered in this blog involves the integration of an allograft in a non-invasive way. A small hole was created by punching the soft tissue to lift the sinus floor. This surgical method ensures correct placement and angulation of modern dental implants. It also provides sufficient bone density to enable implant stability and osseointegration over a length of time. The general practitioner must ensure that 70% of the implant is placed in the natural bone.

| PRODUCTS | QTY | PRICE | VALUE in INR |
|---|
| PRODUCTS | QTY | PRICE | VALUE in INR |
|---|