The study titled ‘Overcoming Endodontic Procedural Failures’ was originally published by Dentistry Today.
For a successful endodontic treatment, multiple dependent procedures need to be followed in a consecutive manner. Each procedure relies on the preceding one to having been done properly. When a certain procedure fails, it is more likely for the subsequent procedure to fail as well.
Considering these factors, endodontic treatment can often be time-consuming and difficult. The article aims to help dentists conduct a successful endodontic treatment by highlighting some common procedural pitfalls that could lead to treatment failures.
Endodontic Anatomy
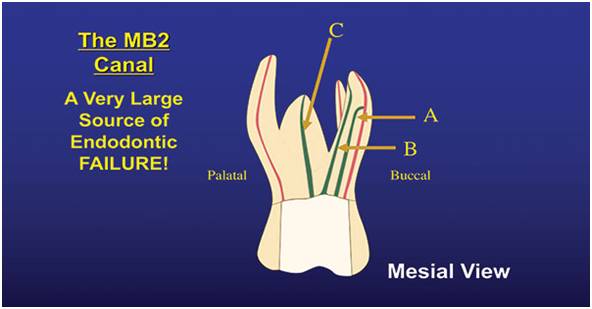
The lack of a clear understanding of endodontic anatomy is one of the primary reasons for failure. It leads to not locating and treating certain canals. A lack of treatment commonly causes an infection to occur in the canal and the tooth, leading to endodontic treatment failure. When locating the MB2 canal, determining the number of canals present and their location in mandibular bicuspids, two common occurring anatomical procedural faults could happen.
The MB2 is difficult to locate and does not easily show up on a periapical radiograph (PA). However, due to technological advancement in CBCT, MB2 is easily visible on the radiographs. Once the canal is established, the next question is, where to look?
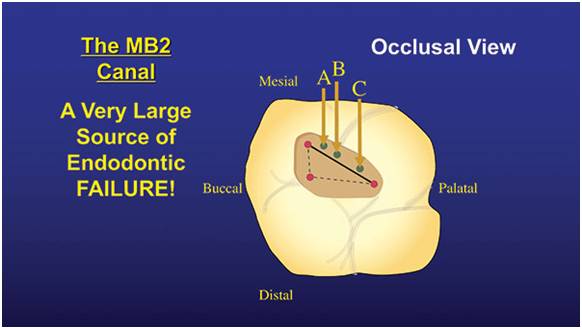
By drawing an imaginary line between the palatal canals and MB, the MB2 can be found. It will be found close to the MB canal, mesial of the line. To be more specific, it is within the 3-5 mm of the MB canal. Depending on the location, it can either one of three orientations.
In the “A” location, it merges with the MB canal and there is a common apex for the two canals. If found in the “B” location, both MB and MB2 have their own apex and are separate from one another. In the case of the “C” location, a separate MB2 root can be found between the palatal roots and MB.
Mandibular bicuspids can often be very tricky to treat. This depends on the splitting of the canal and where the splitting takes palace along the length of the canal. Fortunately, it can be displayed through a CBCT scan and a PA radiograph.
If a large coronal canal becomes thin or disappears down the root, it indicates that the canal is split into 2 or 3 canals. The closer the split is to the apex, the tougher it is to treat. If the splitting occurs in the apical third of the root, the best option is to not treat it. It’s better to refer to an endodontist instead.
Irrigation
One of the vital steps during endodontic treatment that can lead to errors is irrigation. The issue is that mechanical debridement can remove 35-50% of canal debris. How to extract the rest and eliminate any bacteria in the tubules and the canal? The other issue is that there isn’t one irrigant that can accomplish everything needed. In this case, what should be used? Sodium hypochlorite is an irrigant that can effectively dissolve soft tissue. It can be used right out of the bottle at 6%. However, when kept under the sink, the oxygen and potency will be lost after 3 months or so.
It has a greenish color and a distinct smell when it is fresh. Keep it in contact with the canal for a long duration. Hypochlorite usually works better in warm temperature. It can be used at the start of instrumentation, up until the final two instrumentations. For the last two, switch to Irritrol. It is a combination of chlorhexidine (CHX) and EDTA.
The tubules and the smear layer are removed by the EDTA. This allows CHX to quickly eliminate bacteria in the tubules. CHX can kill the Enterococcus Faecalis bug effectively. After the completion of irrigation, whatever debris and bacteria that is left in the canal can be killed with EDS #6 PUI tip (EDS) and passive ultrasonic irrigation (PUI) accompanied by hypochlorite.
It is important to note that the access opening and canal must be washed with an anesthetic solution or sterile water after suing hypochlorite. This will ensure that a precipitate does not form when hypochlorite comes in the proximity of CHX or EDTA.
Underfills and Overfills
The canal must not be underfilled and overfilled with gutta-percha (GP). So how to locate the sweet spot? To achieve the highest rate for endodontic success, the GP must be placed at the anatomic apex with the help of an apex locator. While using the apex locator to determine the working length, the GP could appear to be 0.0-2.0 mm short of the radiographic apex. Rely on the apex locator. This way, you will have successful treatments and fewer patients with postoperative issues.
Obturation procedural mistakes can be significantly lowered by opting for an easy technique that allows you to place the GP where you want to. The easiest filling method is single-cone GP by using an epoxy sealer. It is preferable because it sticks to almost everything and is antibacterial as well. What’s more, if it goes past the apex, it does not hurt and usually resorbs in about 6-12 months.
Conclusion:
Procedural errors can be expensive and time-consuming for the patient and the dentist and can cause frustration while performing the overall procedure. However, even if they are a little time-consuming, it is wise to conduct these procedures correctly to increase the chances of treatment success.